Learning how to draw a pumpkin can be a fun and creative way to express your artistic skills. Whether you're a beginner or an experienced artist, drawing pumpkins is an excellent activity that can inspire creativity and improve your drawing techniques. Pumpkins are iconic symbols of autumn, harvest, and Halloween, making them a popular subject for artists of all ages.
Drawing a pumpkin may seem simple, but it requires attention to detail, shading, and perspective to make it look realistic. This guide will walk you through the process step by step, ensuring that you gain confidence in your drawing abilities. By the end of this tutorial, you'll have the skills to create stunning pumpkin artwork.
Whether you're looking to create a quick sketch or a detailed masterpiece, this article will provide all the information you need. From basic shapes to advanced shading techniques, we'll cover everything you need to know about how to draw a pumpkin. Let's dive in!
Read also:Discover The Culinary Delights Of Bread Board Falls City Menu
Table of Contents:
- Introduction to Drawing Pumpkins
- Materials You Need
- Understanding Basic Shapes
- Step-by-Step Guide to Draw a Pumpkin
- Tips for Drawing Realistic Pumpkins
- Different Styles of Drawing Pumpkins
- Common Mistakes to Avoid
- Digital Tools for Pumpkin Art
- Examples of Beautiful Pumpkin Drawings
- Conclusion
Introduction to Drawing Pumpkins
Drawing pumpkins is not only a great way to practice your artistic skills but also a fun activity to celebrate the fall season. Pumpkins come in various shapes, sizes, and textures, which makes them an interesting subject for artists. Whether you're sketching a traditional round pumpkin or a more abstract design, the process involves understanding proportions, shading, and perspective.
Before we dive into the technical aspects, it's important to note that practice is key. The more you draw, the better you'll become at capturing the unique characteristics of a pumpkin. In this section, we'll explore the basics of pumpkin anatomy and why it's essential to study the subject before you begin drawing.
Materials You Need
Having the right materials can significantly enhance your drawing experience. Here's a list of essential tools you'll need to get started:
- Pencils (HB, 2B, 4B, 6B)
- Eraser (kneaded and standard)
- Sketchbook or drawing paper
- Blending tools (tortillons or blending stumps)
- Reference images of pumpkins
While these materials are recommended, feel free to experiment with different tools to find what works best for you. Some artists prefer using charcoal or digital tablets, while others stick to traditional pencil and paper.
Understanding Basic Shapes
When learning how to draw a pumpkin, it's crucial to start with basic shapes. Pumpkins are typically round or oval, with distinct ribbing that runs vertically down the fruit. By breaking down the pumpkin into simple geometric forms, you can create a solid foundation for your drawing.
Read also:Crawford Funeral Home In Lancaster Sc A Legacy Of Compassion And Care
Here are some key points to consider:
- Begin with a large oval or circle for the main body.
- Sketch vertical lines to represent the ribbing.
- Add a smaller oval or rectangle for the stem at the top.
Understanding these basic shapes will help you maintain proportion and symmetry in your drawing.
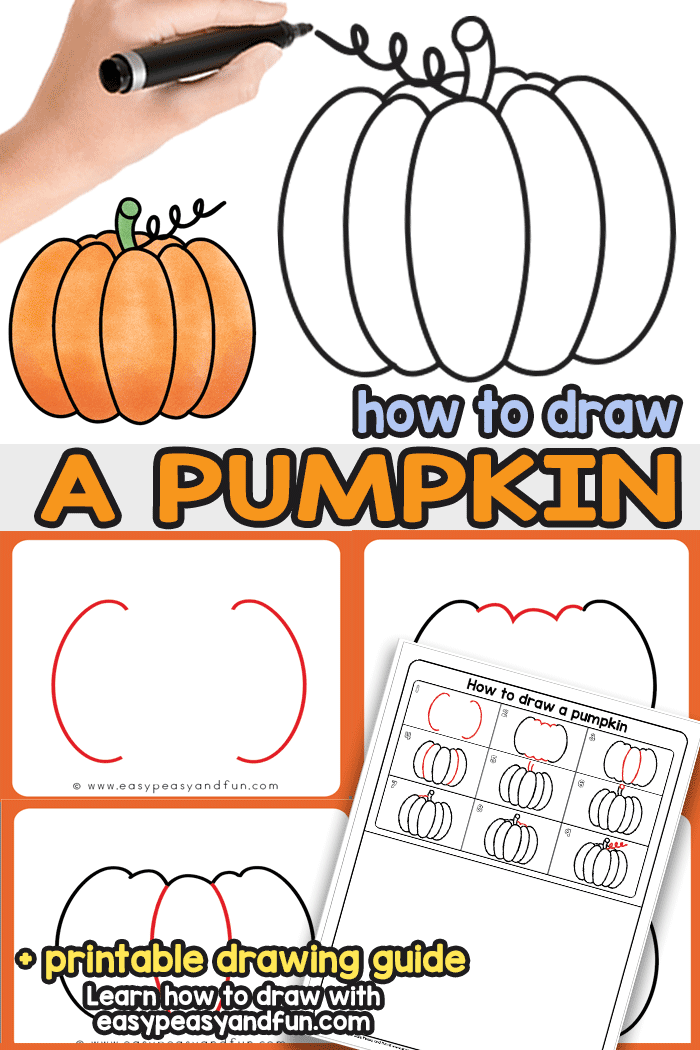
Step-by-Step Guide to Draw a Pumpkin
Step 1: Sketch the Basic Outline
Start by lightly sketching the outline of the pumpkin. Use a soft pencil (HB or 2B) to draw a large oval or circle. This will serve as the base for your pumpkin. Don't worry about perfection at this stage—focus on getting the general shape right.
Step 2: Add the Stem
Once you have the basic shape of the pumpkin, add the stem at the top. The stem is usually smaller and more irregular in shape. Sketch a rough rectangle or oval to represent the stem, ensuring it connects to the top of the pumpkin.
Step 3: Create the Ribbing
Pumpkins have distinct ribbing that runs vertically down their sides. To create this effect, draw several vertical lines from the top to the bottom of the pumpkin. Make sure the lines curve slightly to follow the shape of the fruit.
Step 4: Refine the Shape
Now that you've added the ribbing, refine the overall shape of the pumpkin. Erase any unnecessary guidelines and smooth out the edges. Pay attention to the curves and ensure the ribbing looks natural.
Step 5: Add Shading
Shading is what brings your pumpkin drawing to life. Use a range of pencils (2B, 4B, 6B) to add depth and dimension. Start by identifying the light source and shading the areas that would naturally be in shadow. Gradually build up the shading, paying attention to the transitions between light and dark areas.
Tips for Drawing Realistic Pumpkins
Creating a realistic pumpkin drawing requires attention to detail. Here are some tips to help you achieve a more lifelike result:
- Study reference images to understand the texture and shape of pumpkins.
- Pay attention to the ribbing and how it affects the overall form.
- Use a variety of shading techniques, such as cross-hatching and stippling, to add texture.
- Experiment with different pencil grades to achieve a range of tones.
Remember, practice is key. The more you draw, the better you'll become at capturing the nuances of a pumpkin's appearance.
Different Styles of Drawing Pumpkins
While realism is one approach to drawing pumpkins, there are many other styles you can explore. Here are a few examples:
- Cartoon-style pumpkins: Simplify the shapes and add exaggerated features for a fun, whimsical look.
- Abstract pumpkins: Focus on patterns and textures rather than realism.
- Watercolor pumpkins: Use watercolor paints to create soft, blended effects.
- Digital pumpkins: Utilize digital tools to create vibrant, detailed artwork.
Experimenting with different styles can help you discover new techniques and expand your artistic repertoire.
Common Mistakes to Avoid
Even the most experienced artists make mistakes. Here are some common pitfalls to watch out for when learning how to draw a pumpkin:
- Ignoring the ribbing: The ribbing is a defining feature of pumpkins, so make sure to include it in your drawing.
- Over-shading: Too much shading can make your drawing look muddy. Use a light touch and build up gradually.
- Forgetting the stem: The stem adds character to the pumpkin, so don't overlook it.
By being aware of these common mistakes, you can avoid them and improve your drawing skills.
Digital Tools for Pumpkin Art
If you're interested in digital art, there are many tools available to help you create stunning pumpkin drawings. Programs like Adobe Illustrator, Procreate, and CorelDRAW offer a range of features that can enhance your artwork. These tools allow you to experiment with colors, textures, and effects that may be difficult to achieve with traditional media.
Some popular digital tools for pumpkin art include:
- Procreate: Ideal for iPad users, Procreate offers a wide range of brushes and layers.
- Adobe Illustrator: Perfect for creating vector art, Illustrator allows for precise control over shapes and colors.
- CorelDRAW: A powerful graphic design software that supports both raster and vector images.
Examples of Beautiful Pumpkin Drawings
Looking at examples of beautiful pumpkin drawings can inspire your own creations. Here are a few examples to get you started:
- A realistic charcoal drawing of a pumpkin with intricate shading and texture.
- A colorful watercolor pumpkin with soft, blended edges.
- A cartoon-style pumpkin with a friendly face and exaggerated features.
Studying these examples can help you develop your own unique style and approach to drawing pumpkins.
Conclusion
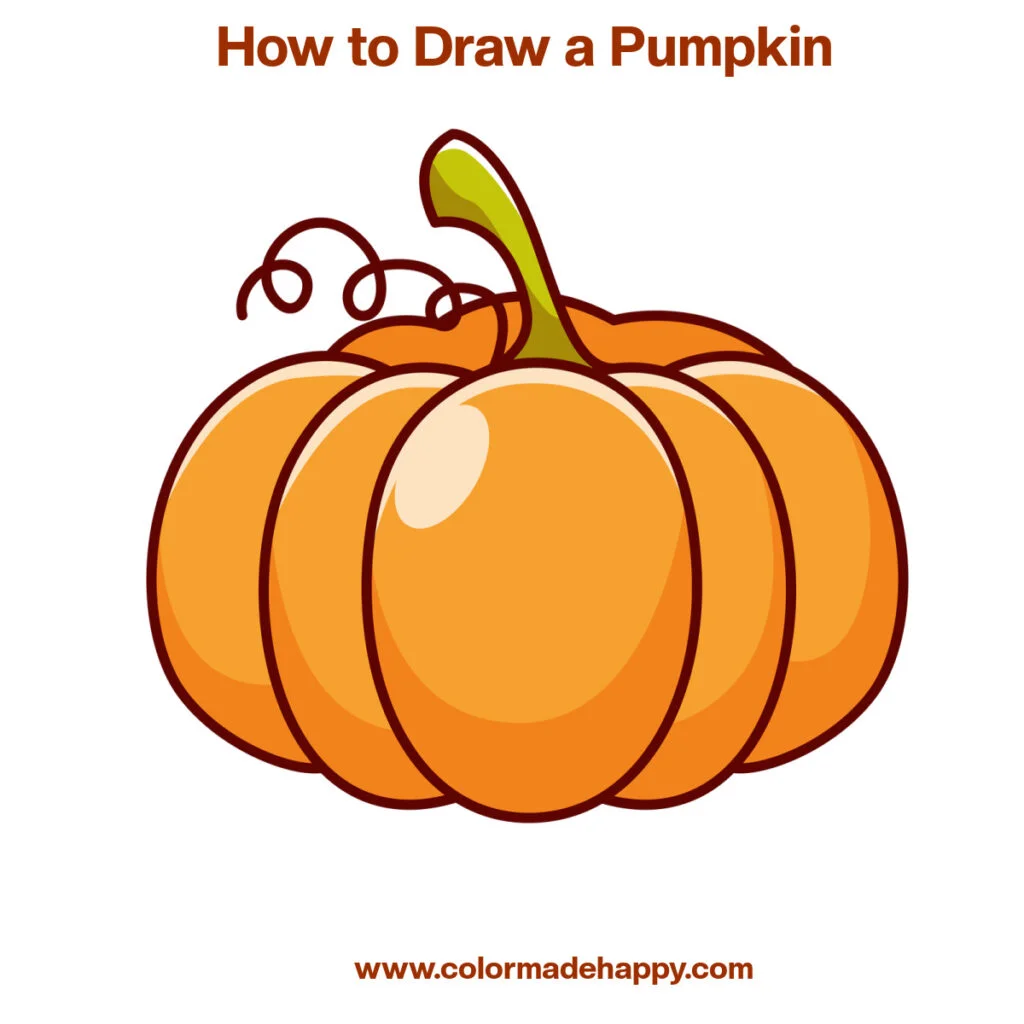
Learning how to draw a pumpkin is a rewarding experience that can improve your artistic skills and creativity. By following the steps outlined in this guide, you can create stunning pumpkin artwork that captures the essence of this iconic fruit. Remember to practice regularly, study reference images, and experiment with different styles and techniques.
We encourage you to share your pumpkin drawings in the comments below or on social media. Your feedback and creations inspire others to explore their artistic potential. Don't forget to check out our other articles for more tips and tutorials on drawing and art.